Enterprise Install
Refer to the following sections to troubleshoot errors encountered when installing an Enterprise Cluster.
Scenario - Self-linking Error
When installing an Enterprise Cluster, you may encounter an error stating that the enterprise cluster is unable to self-link. Self-linking is the process of Palette or VerteX becoming aware of the Kubernetes cluster it is installed on. This error may occur if the self-hosted pack registry specified in the installation is missing the Certificate Authority (CA). This issue can be resolved by adding the CA to the pack registry.
Debug Steps
-
Log in to the pack registry server that you specified in the Palette or VerteX installation.
-
Download the CA certificate from the pack registry server. Different OCI registries have different methods for downloading the CA certificate. For Harbor, check out the Download the Harbor Certificate guide.
-
Log in to the system console. Refer to Access Palette system console or Access Vertex system console for additional guidance.
-
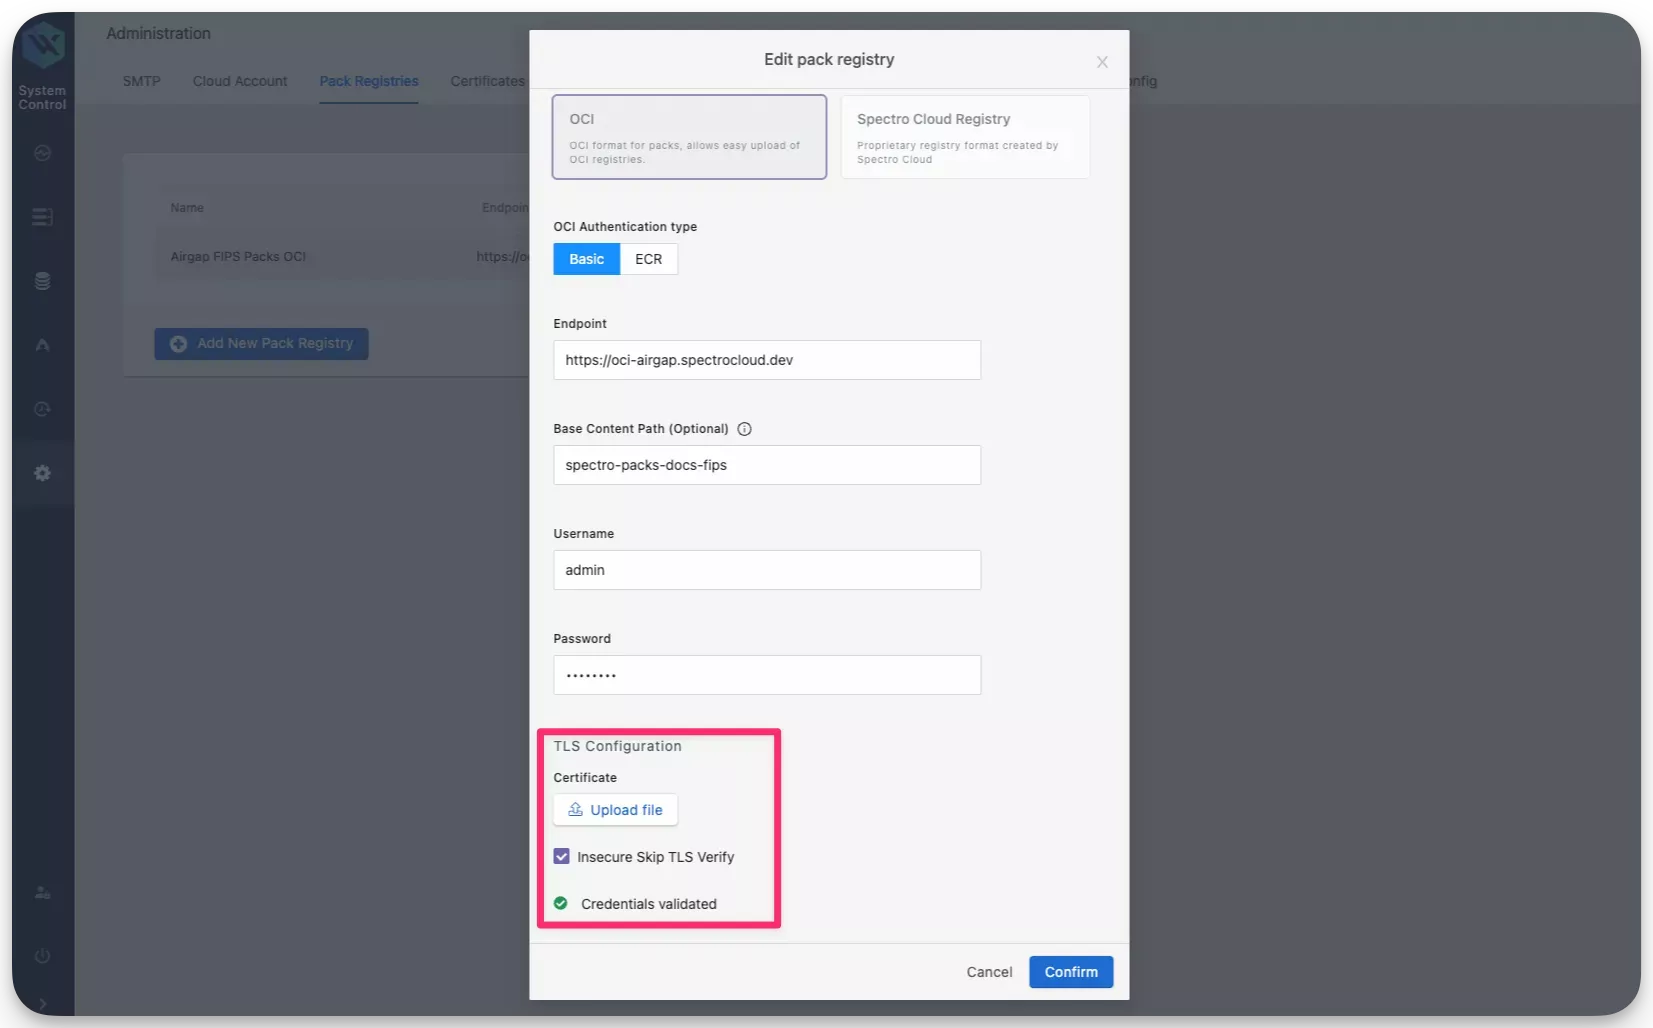
From the left navigation menu, select Administration and click on the Pack Registries tab.
-
Click on the three-dot Menu icon for the pack registry that you specified in the installation and select Edit.
-
Click on the Upload file button and upload the CA certificate that you downloaded in step 2.
-
Check the box Insecure Skip TLS Verify and click on Confirm.
After a few moments, a system profile will be created and Palette or VerteX will be able to self-link successfully. If you continue to encounter issues, contact our support team by emailing support@spectrocloud.com so that we can provide you with further guidance.
Scenario - Enterprise Backup Stuck
In the scenario where an enterprise backup is stuck, a restart of the management pod may resolve the issue. Use the following steps to restart the management pod.
Debug Steps
-
Open up a terminal session in an environment that has network access to the Kubernetes cluster. Refer to the Access Cluster with CLI for additional guidance.
-
Identify the
mgmtpod in thehubble-systemnamespace. Use the following command to list all pods in thehubble-systemnamespace and filter for themgmtpod.kubectl get pods --namespace hubble-system | grep mgmtmgmt-f7f97f4fd-lds69 1/1 Running 0 45m -
Restart the
mgmtpod by deleting it. Use the following command to delete themgmtpod. Replace<mgmt-pod-name>with the actual name of themgmtpod that you identified in step 2.kubectl delete pod <mgmt-pod-name> --namespace hubble-systempod "mgmt-f7f97f4fd-lds69" deleted
Non-unique vSphere CNS Mapping
In Palette and VerteX releases 4.4.8 and earlier, Persistent Volume Claims (PVCs) metadata do not use a unique identifier for self-hosted Palette clusters. This causes incorrect Cloud Native Storage (CNS) mappings in vSphere, potentially leading to issues during node operations and upgrades.
This issue is resolved in Palette and VerteX releases starting with 4.4.14. However, upgrading to 4.4.14 will not automatically resolve this issue. If you have self-hosted instances of Palette in your vSphere environment older than 4.4.14, you should execute the following utility script manually to make the CNS mapping unique for the associated PVC.
Debug Steps
-
Ensure your machine has network access to your self-hosted Palette instance with
kubectl. Alternatively, establish an SSH connection to a machine where you can access your self-hosted Palette instance withkubectl. -
Log in to your self-hosted Palette instance System Console.
-
In the Main Menu, click Enterprise Cluster.
-
In the cluster details page, scroll down to the Kubernetes Config File field and download the kubeconfig file.
-
Issue the following command to download the utility script.
curl --output csi-helper https://software.spectrocloud.com/tools/csi-helper/csi-helper -
Adjust the permission of the script.
chmod +x csi-helper -
Issue the following command to execute the utility script. Replace the placeholder with the path to your kubeconfig file.
./csi-helper --kubeconfig=<PATH_TO_KUBECONFIG> -
Issue the following command to verify that the script has updated the cluster ID.
kubectl describe configmap vsphere-cloud-config --namespace=kube-systeIf the update is successful, the cluster ID in the ConfigMap will have a unique ID assigned instead of
spectro-mgmt/spectro-mgmt-cluster.Name: vsphere-cloud-config
Namespace: kube-system
Labels: component=cloud-controller-manager
vsphere-cpi-infra=config
Annotations: cluster.spectrocloud.com/last-applied-hash: 17721994478134573986
Data
====
vsphere.conf:
----
[Global]
cluster-id = "896d25b9-bfac-414f-bb6f-52fd469d3a6c/spectro-mgmt-cluster"
[VirtualCenter "vcenter.spectrocloud.dev"]
insecure-flag = "true"
user = "example@vsphere.local"
password = "************"
[Labels]
zone = "k8s-zone"
region = "k8s-region"
BinaryData
====
Events: <none>Volume Attachment Errors Volume in VMware Environment
If you deployed Palette in a VMware vSphere environment and are experiencing volume attachment errors for the MongoDB pods during the upgrade process, it may be due to duplicate resources in the cluster causing resource creation errors. Palette versions between 4.0.0 and 4.3.0 are affected by a known issue where cluster resources are not receiving unique IDs. Use the following steps to correctly identify the issue and resolve it.
Debug Steps
-
Open up a terminal session in an environment that has network access to the Kubernetes cluster.
-
Configure kubectl CLI to connect to the self-hosted Palette or VerteX's Kubernetes cluster. Refer to the Access Cluster with CLI for additional guidance.
-
Verify the MongoDB pods are not starting correctly by issuing the following command.
kubectl get pods --namespace=hubble-system --selector='app=spectro,role=mongo'NAME READY STATUS RESTARTS AGE
mongo-0 2/2 Running 0 17h
mongo-1 2/2 Running 0 17h
mongo-2 0/2 ContainerCreating 0 16m -
Inspect the pod that is not starting correctly. Use the following command to describe the pod. Replace
mongo-2with the name of the pod that is not starting.kubectl describe pod mongo-2 --namespace=hubble-system -
Review the event output for any errors. If an error related to the volume attachment is present, proceed to the next step.
Events:
Type     Reason              Age                  From                     Message
----     ------              ----                 ----                     -------
Warning  FailedAttachVolume  106s (x16 over 18m)  attachdetach-controller  AttachVolume.Attach failed for volume "pvc-94cbb8f5-9145-4b18-9bf9-ee027b64d0c7" : volume attachment is being deleted
Warning FailedMount 21s (x4 over 16m) kubelet Unable to attach or mount volumes: unmounted volumes=[mongo-data], unattached volumes=[spectromongokey kube-api-access-sz5lz mongo-data spectromongoinit spectromongopost]: timed out waiting for the condition -
The remaining steps may need to be performed on all MongoDB pods and their associated Persistent Volume (PV), and Persistent Volume Claim (PVC). Do each step sequentially for each MongoDB pod that is encountering the volume attachment error.
warningOnly do the steps for one MongoDB pod at a time to prevent data loss. Wait for the pod to come up correctly before proceeding to the next pod.
-
Delete the PVC associated with the MongoDB pod. Replace
mongo-2with the name of the pod that is not starting.kubectl delete pvc mongo-data-mongo-2 --namespace=hubble-system -
Delete the PV associated with the MongoDB pod. Use the following command to list all PVs and find the PV associated with the MongoDB pod you started with. In this example, the PV associated with
mongo-2ispvc-94cbb8f5-9145-4b18-9bf9-ee027b64d0c7. Make a note of this name.kubectl get pv | grep 'mongo-data-mongo-2'pvc-94cbb8f5-9145-4b18-9bf9-ee027b64d0c7 20Gi RWO Delete Bound hubble-system/mongo-data-mongo-2 spectro-storage-class 18h -
Using the PV name from the previous step, delete the PV.
kubectl delete pv pvc-94cbb8f5-9145-4b18-9bf9-ee027b64d0c7tipThe kubectl command may hang after issuing the delete command, press
Ctrl+Cto exit the command and proceed to the next step. -
Delete the MongoDB pod that was not starting correctly. Replace
mongo-2with the name of the pod that is not starting.kubectl delete pod mongo-2 --namespace=hubble-system -
Wait for the pod to come up correctly. Use the following command to verify the pod is up and available.
kubectl get pods --namespace=hubble-system --selector='app=spectro,role=mongo'NAME READY STATUS RESTARTS AGE
mongo-0 2/2 Running 0 18h
mongo-1 2/2 Running 0 18h
mongo-2 2/2 Running 0 68swarningOnce the pod is in the Running status, wait for at least five minutes for the replication to complete before proceeding with the other pods.
Palette will proceed with the upgrade and attempt to upgrade the remaining MongoDB pods. Repeat the steps for each of the MongoDB pods that are not starting correctly due to the volume attachment error.
The upgrade process will continue once all MongoDB pods are up and available. Verify the new nodes deployed successfully by checking the status of the nodes. Log in to the system console, navigate to left Main Menu and select Enterprise Cluster. The Nodes tab will display the status of the nodes in the cluster.
If you continue to encounter issues, contact our support team by emailing support@spectrocloud.com so that we can provide you with further guidance.