Import and Deploy OVAs to Palette VMO
VMware vSphere Virtual Machines (VMs) can be exported using the Open Virtual Appliance (OVA) format. This allows users to share configurations and create templates for their VMs. These important templates need to be converted into Kubernetes compatible formats before they can be used in a Kubernetes cluster.
The Palette CLI provides the ability to import and deploy OVAs to Palette VMO.
Limitations
- Only OVAs whose operating systems are included under
virt-v2vsupported guest systems can be imported.
Prerequisites
-
A Healthy VMO cluster. Refer to the Create a VMO Profile for further guidance.
- Ensure that your VMO cluster has sufficient capacity for any VMs that you deploy. Refer to the Environment Setup page for recommended environment sizes.
If you need to provision Block storage volumes during the VM deployment process, add the following custom
configuration to your VMO cluster OS pack. Applying this configuration may cause a cluster repave. For more information,
refer to
Repave Behaviors and Configurations
Additionally, we recommend provisioning volumes with the ReadWriteMany access mode to ensure that VMs can be
live migrated.
kubeadmconfig:
  preKubeadmCommands:
    # Start containerd with new configuration
    - systemctl daemon-reload
    - systemctl restart containerd
  files:
    - targetPath: /etc/containerd/config.toml
  targetOwner: "root:root"
  targetPermissions: "0644"
  content: |
    ## template: jinja

    # Use config version 2 to enable new configuration fields.
    version = 2

    imports = ["/etc/containerd/conf.d/*.toml"]

    [plugins]
        [plugins."io.containerd.grpc.v1.cri"]
        sandbox_image = "registry.k8s.io/pause:3.9"
        device_ownership_from_security_context = true
        [plugins."io.containerd.grpc.v1.cri".containerd.runtimes.runc]
        runtime_type = "io.containerd.runc.v2"
        [plugins."io.containerd.grpc.v1.cri".containerd.runtimes.runc.options]
        SystemdCgroup = true
If you are in a proxied environment, you must configure the CDI custom resource in order to deploy to a DataVolume.
Refer to the
CDI Configuration
documentation.
If you have configured Nginx together with MetalLB, add an entry to /etc/hosts that maps the CDI upload proxy host
name, for example cdi-uploadproxy.mycompany.io, to the Nginx load balancer’s public IP address.
- Install kubectl command-line tool. Refer to the kubectl installation guide to learn more.
- Install the virtctl command-line tool. Refer to the virtctl installation guide for more information.
Enablement
-
Download the Kubeconfig file of the VMO cluster.
-
Open a terminal window and set the environment variable
KUBECONFIGto point to the file you downloaded.export KUBECONFIG=<path-to-kubeconfig-file> -
Execute the following command in your terminal. It creates a dedicated VM inside your VMO cluster which contains all the tools required for OVA import and deployment. The VM is named
vmo-jh.cat <<EOF | kubectl apply --filename -
apiVersion: kubevirt.io/v1
kind: VirtualMachine
metadata:
name: vmo-jh
namespace: default
spec:
dataVolumeTemplates:
- metadata:
name: vmo-jh-dv
spec:
pvc:
accessModes:
- ReadWriteMany
resources:
requests:
storage: 66Gi
source:
registry:
url: gcr.io/spectro-images-public/release/vmo-jh:v4.5.0
running: true
template:
metadata:
labels:
kubevirt.io/vm: vmo-jh
spec:
domain:
cpu:
cores: 2
sockets: 2
threads: 1
devices:
disks:
- disk:
bus: virtio
name: datavolume-os
- disk:
bus: virtio
name: cloudinitdisk
interfaces:
- masquerade: {}
model: virtio
name: default
machine:
type: q35
resources:
requests:
memory: 8Gi
networks:
- name: default
pod: {}
volumes:
- dataVolume:
name: vmo-jh-dv
name: datavolume-os
- cloudInitNoCloud:
userData: |
packages:
- qemu-guest-agent
runcmd:
- ["sudo", "systemctl", "enable", "--now", "qemu-guest-agent"]
name: cloudinitdisk
EOFinfoDepending on the configuration of your VMO cluster's CSI layer, you may need to change the configured
ReadWriteManyaccess mode toReadWriteOnce. Check the documentation for your chosen CSI to ensure you have the correct setting. -
The VM provisioning and start up process will take a few minutes to complete. Execute the following command to check the status of your VMs.
kubectl get vms --all-namespacesThe
vmo-jhVM appears in the stateRunningwhen it is ready for usage.NAMESPACE NAME AGE STATUS READY
default vmo-jh 6m16s Running True -
The VM is created with the
Welcome@123default password and is accessible through your cluster's kubeconfig file. You can secure access to the cluster by uploading a public key to the VM and adding it as an authorized key. You will then need to supply the corresponding private key when connecting to the VM.virtctl scp public-key.pub root@vmo-jh.default:/root
virtctl ssh root@vmo-jh.default --local-ssh=true
mkdir -p /root/.ssh && cat /root/public-key.pub >> /root/.ssh/authorized_keysinfoIf you are starting an SSH session from a Windows machine, then you should omit the
--local-ssh=trueflag and execute the commandvirtctl ssh root@vmo-jh.defaultonly. -
Copy your cluster's kubeconfig file to the VM. Replace the placeholders with local path to the kubeconfig file and the path to your private key. The kubeconfig file is required for subsequent operations.
virtctl scp <path-to-downloaded-kubeconfig-file> --identity-file <path-to-private-key> root@vmo-jh.default:/root -
Download the newest Palette CLI binary. Copy the binary to the VM, in the same way you copied the kubeconfig file. Replace the placeholders with local path to the downloaded binary and the path to your private key.
virtctl scp <path-to-downloaded-palette-cli-binary> --identity-file <path-to-private-key> root@vmo-jh.default:/root -
Start an SSH session with the VM.
virtctl ssh --identity-file <path-to-private-key> root@vmo-jh.default --local-ssh=true -
Download an OVA file to import on the VM. Alternatively, you can upload the OVA file using
virtctl scpas demonstrated in previous steps. This guide uses a publicly available Bitnami image for demonstration purposes.curl --location https://downloads.bitnami.com/files/stacks/wordpress/6.2.2/bitnami-wordpress-6.2.2-r1-debian-11-amd64.ova --output bitnami-wordpress-6.2.2-r1-debian-11-amd64.ova -
Set the environment variable
KUBECONFIGto point to the file you uploaded. This allows your terminal session to connect to your VMO cluster.export KUBECONFIG=<path-to-kubeconfig-file> -
Execute the following command to start an interactive shell and begin the import process.
palette vmo import-ovatipYou can save your configuration to a file, allowing you to revise your configuration and perform the import later.
palette vmo import-ova --config-onlyThe Palette CLI prompts you for information regarding the OVA you want to import.
Parameter Description Values OVA Path The path to the image your have uploaded to your VM. The path for the example provided is /root/bitnami-wordpress-6.2.2-r1-debian-11-amd64.ova/.Container Disk Upload Method Indicate whether to upload the image directly to the target cluster as a DataVolumeor build and push a Docker image. You will need to provide an existing image registry if you select Docker.DataVolume/Docker ImageKubeconfig Path The path to the kubeconfig file you have uploaded to your VM. DataVolume Namespace The namespace to create your DataVolume, if you selected this option previously.DataVolume Name The name of your DataVolume.Overhead Percentage for DataVolume Size Set an overhead percentage for your DataVolumecompared to the OVA specification. This parameter is optional and can be skipped with the value-1. If skipped, the filesystem overhead percentage will be inferred from the CDI Custom Resource in your VMO cluster. Refer to the CDI Configuration for further details.Access Mode for the PVC Set the access mode for your DataVolume. Ensure that your configured CSI supports your selection.ReadWriteMany/ReadWriteOnceCreate a PVC with VolumeMode=Block Indicate whether to set Blockvolume mode on theDataVolume.y/NStorageClass The storage class on the destination that will be used to create the VM volume. CDI Upload Proxy URL Optionally, provide a URL to upload the CDI custom resource. If you have configured a CDI as part of your environment, specify https://cdi-uploadproxy.mycompany.io. Refer to the Prerequisites section for configuration details. -
The import may take a few minutes to complete. The Palette CLI outputs the path for your OVA configuration file. Make a note of it.
-
Your imported OVA is now ready to be deployed to a new VM inside your VMO cluster. Execute the following command to start an interactive shell and begin the deployment process. Replace the path placeholder with the path of your OVA configuration file.
palette vmo deploy-ova --config-file <path-to-ova-configuration-file>The Palette CLI prompts you for information regarding the VM you want to deploy.
Parameter Description Values VM Namespace The namespace to create your VM into. VM Name The namespace of your VM. Start VM Automatically? Indicate whether to start your VM after creation. y/N -
Depending on the configuration of your OVA, you may be prompted to provide additional values for the OVF template variables. The deployment of your VM should complete within a few minutes.
The import may generate a variety of warnings during the deployment process, including many repeated lines
containing the word (BADINDEX). All of these warnings and messages can safely be ignored. If a fatal error is
encountered, Palette CLI will exit completely.
You may need to make minor edits to the auto-generated VM specification if you want to configure
Multus VLAN for each network interface.
If uploading your image to a DataVolume upload fails, you may restart the upload after debugging any CDI issues. Execute the command palette vmo import-ova --config-file <path-to-ova-config.yaml> --skip-convert.
Validate
-
Log into Palette.
-
From the left Main Menu, select Clusters. Then, choose the VMO cluster that you deployed your OVA to. The Overview tab appears.
-
Select the Virtual Machines tab. Then, select your migration namespace from the Namespace drop-down Menu. Your deployed VM appears in the list of Virtual Machines. Select your VM to view its details. It is in a Running state.
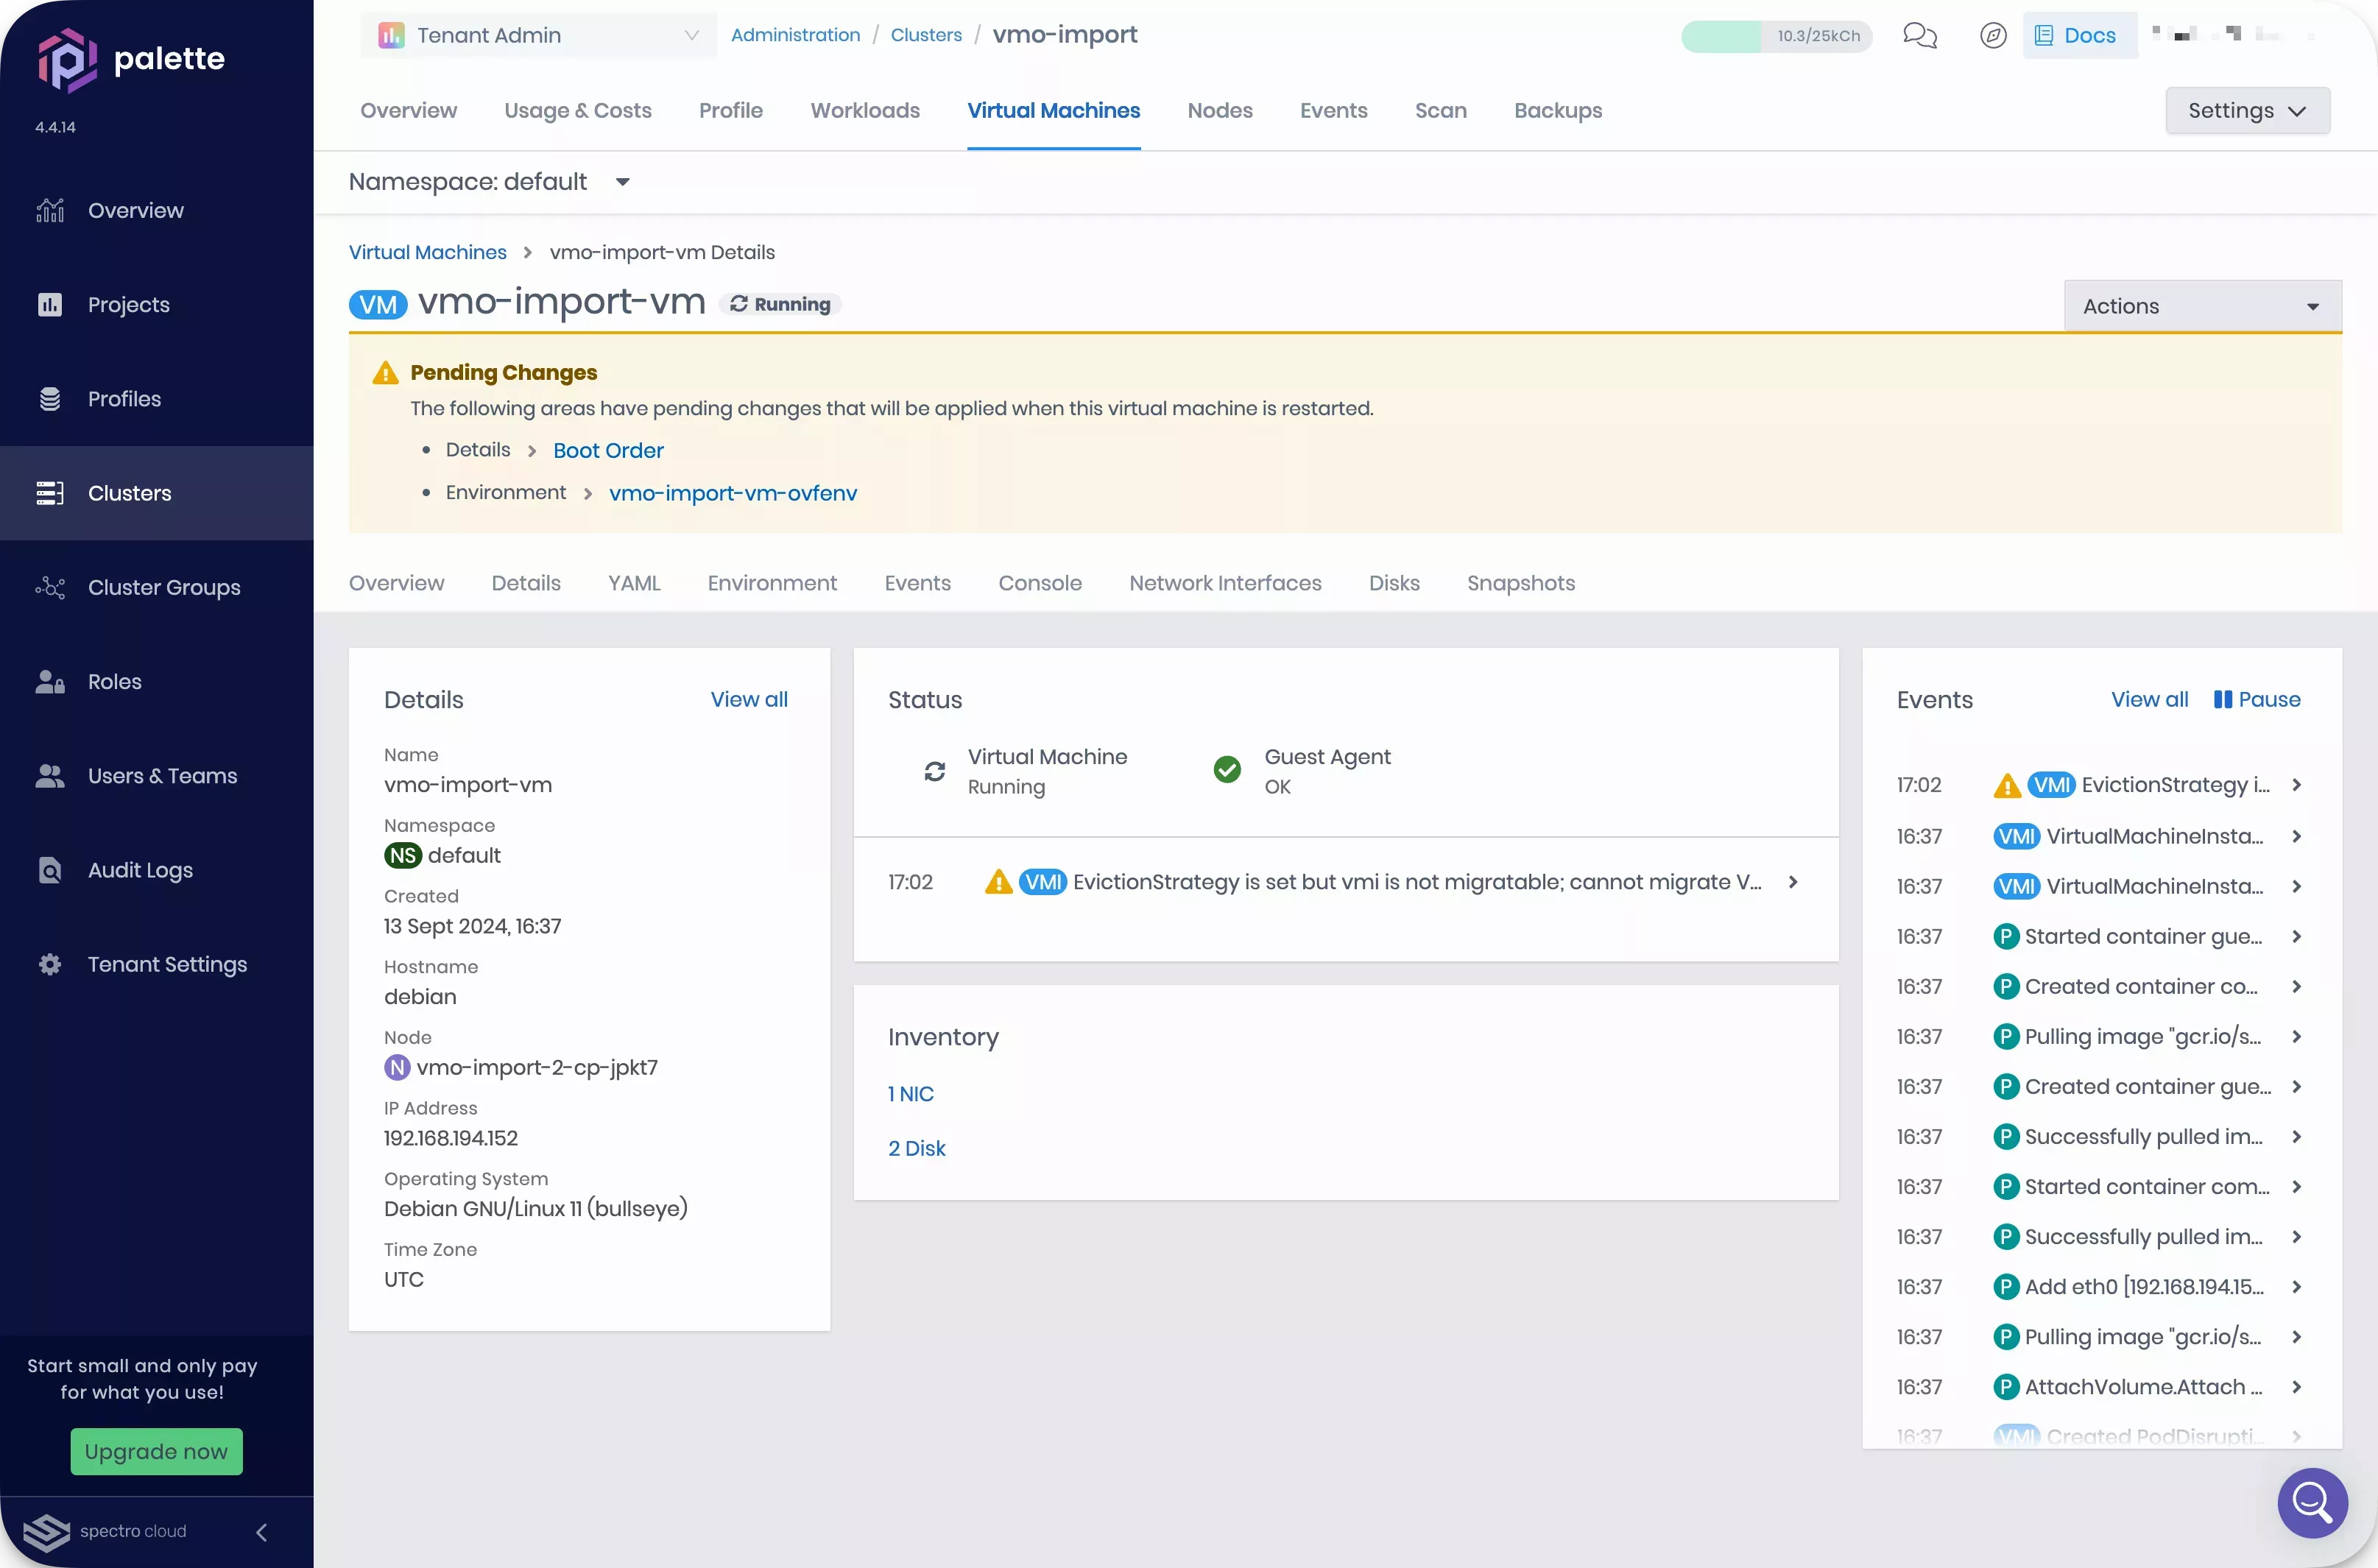
-
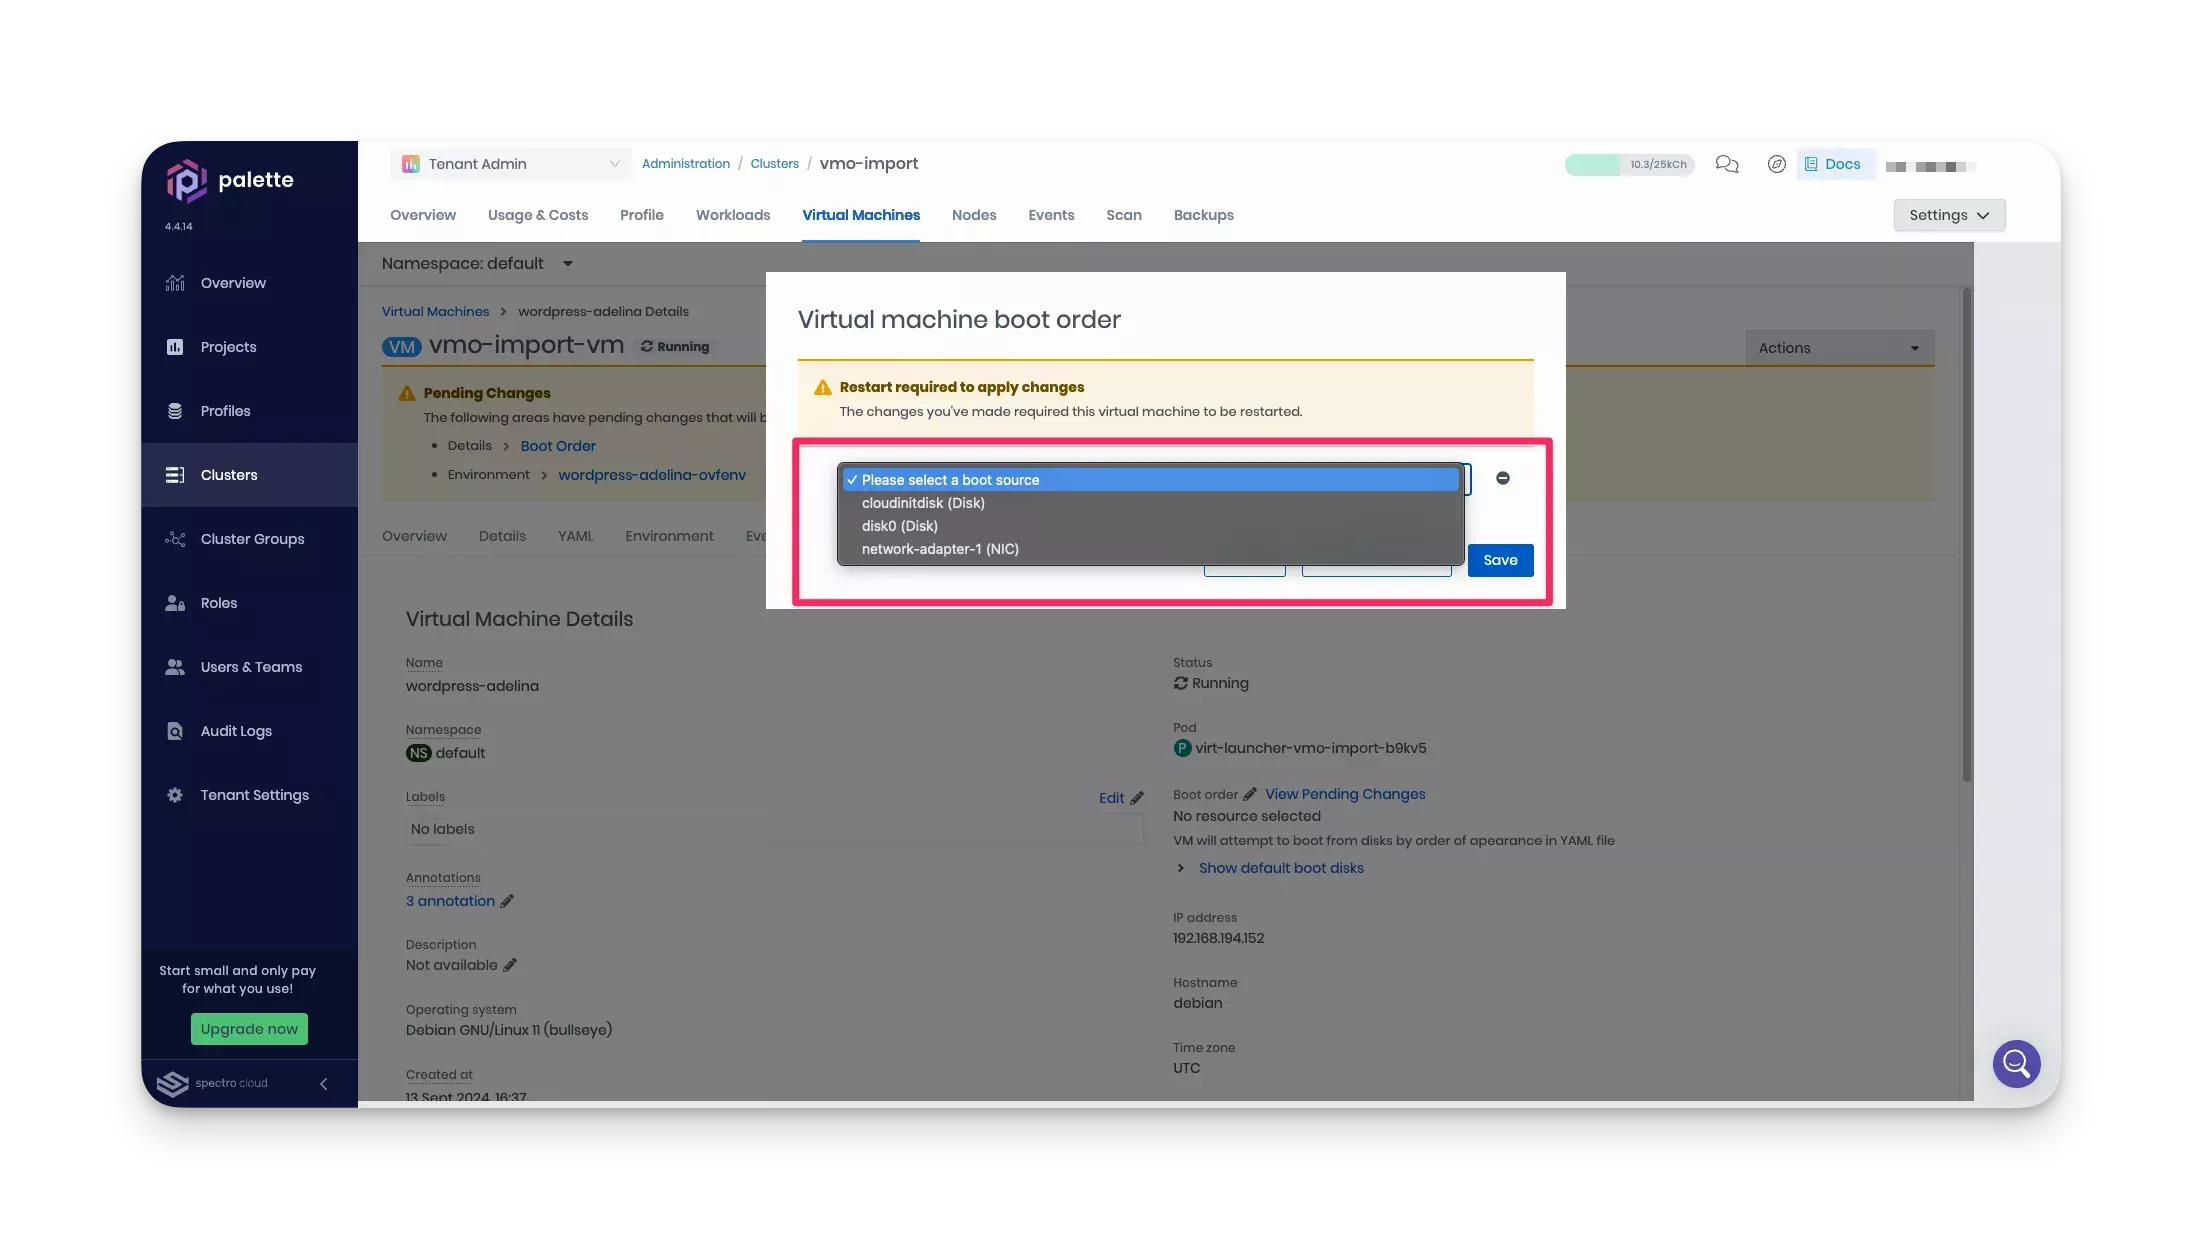
Even though your VM is healthy, Palette displays two warnings. You can resolve them from the UI. Click Boot Order. The Virtual machine boot order dialog appears.
-
Select a boot source for your VM from the list of available disks. Then, click Save. The dialog closes.
-
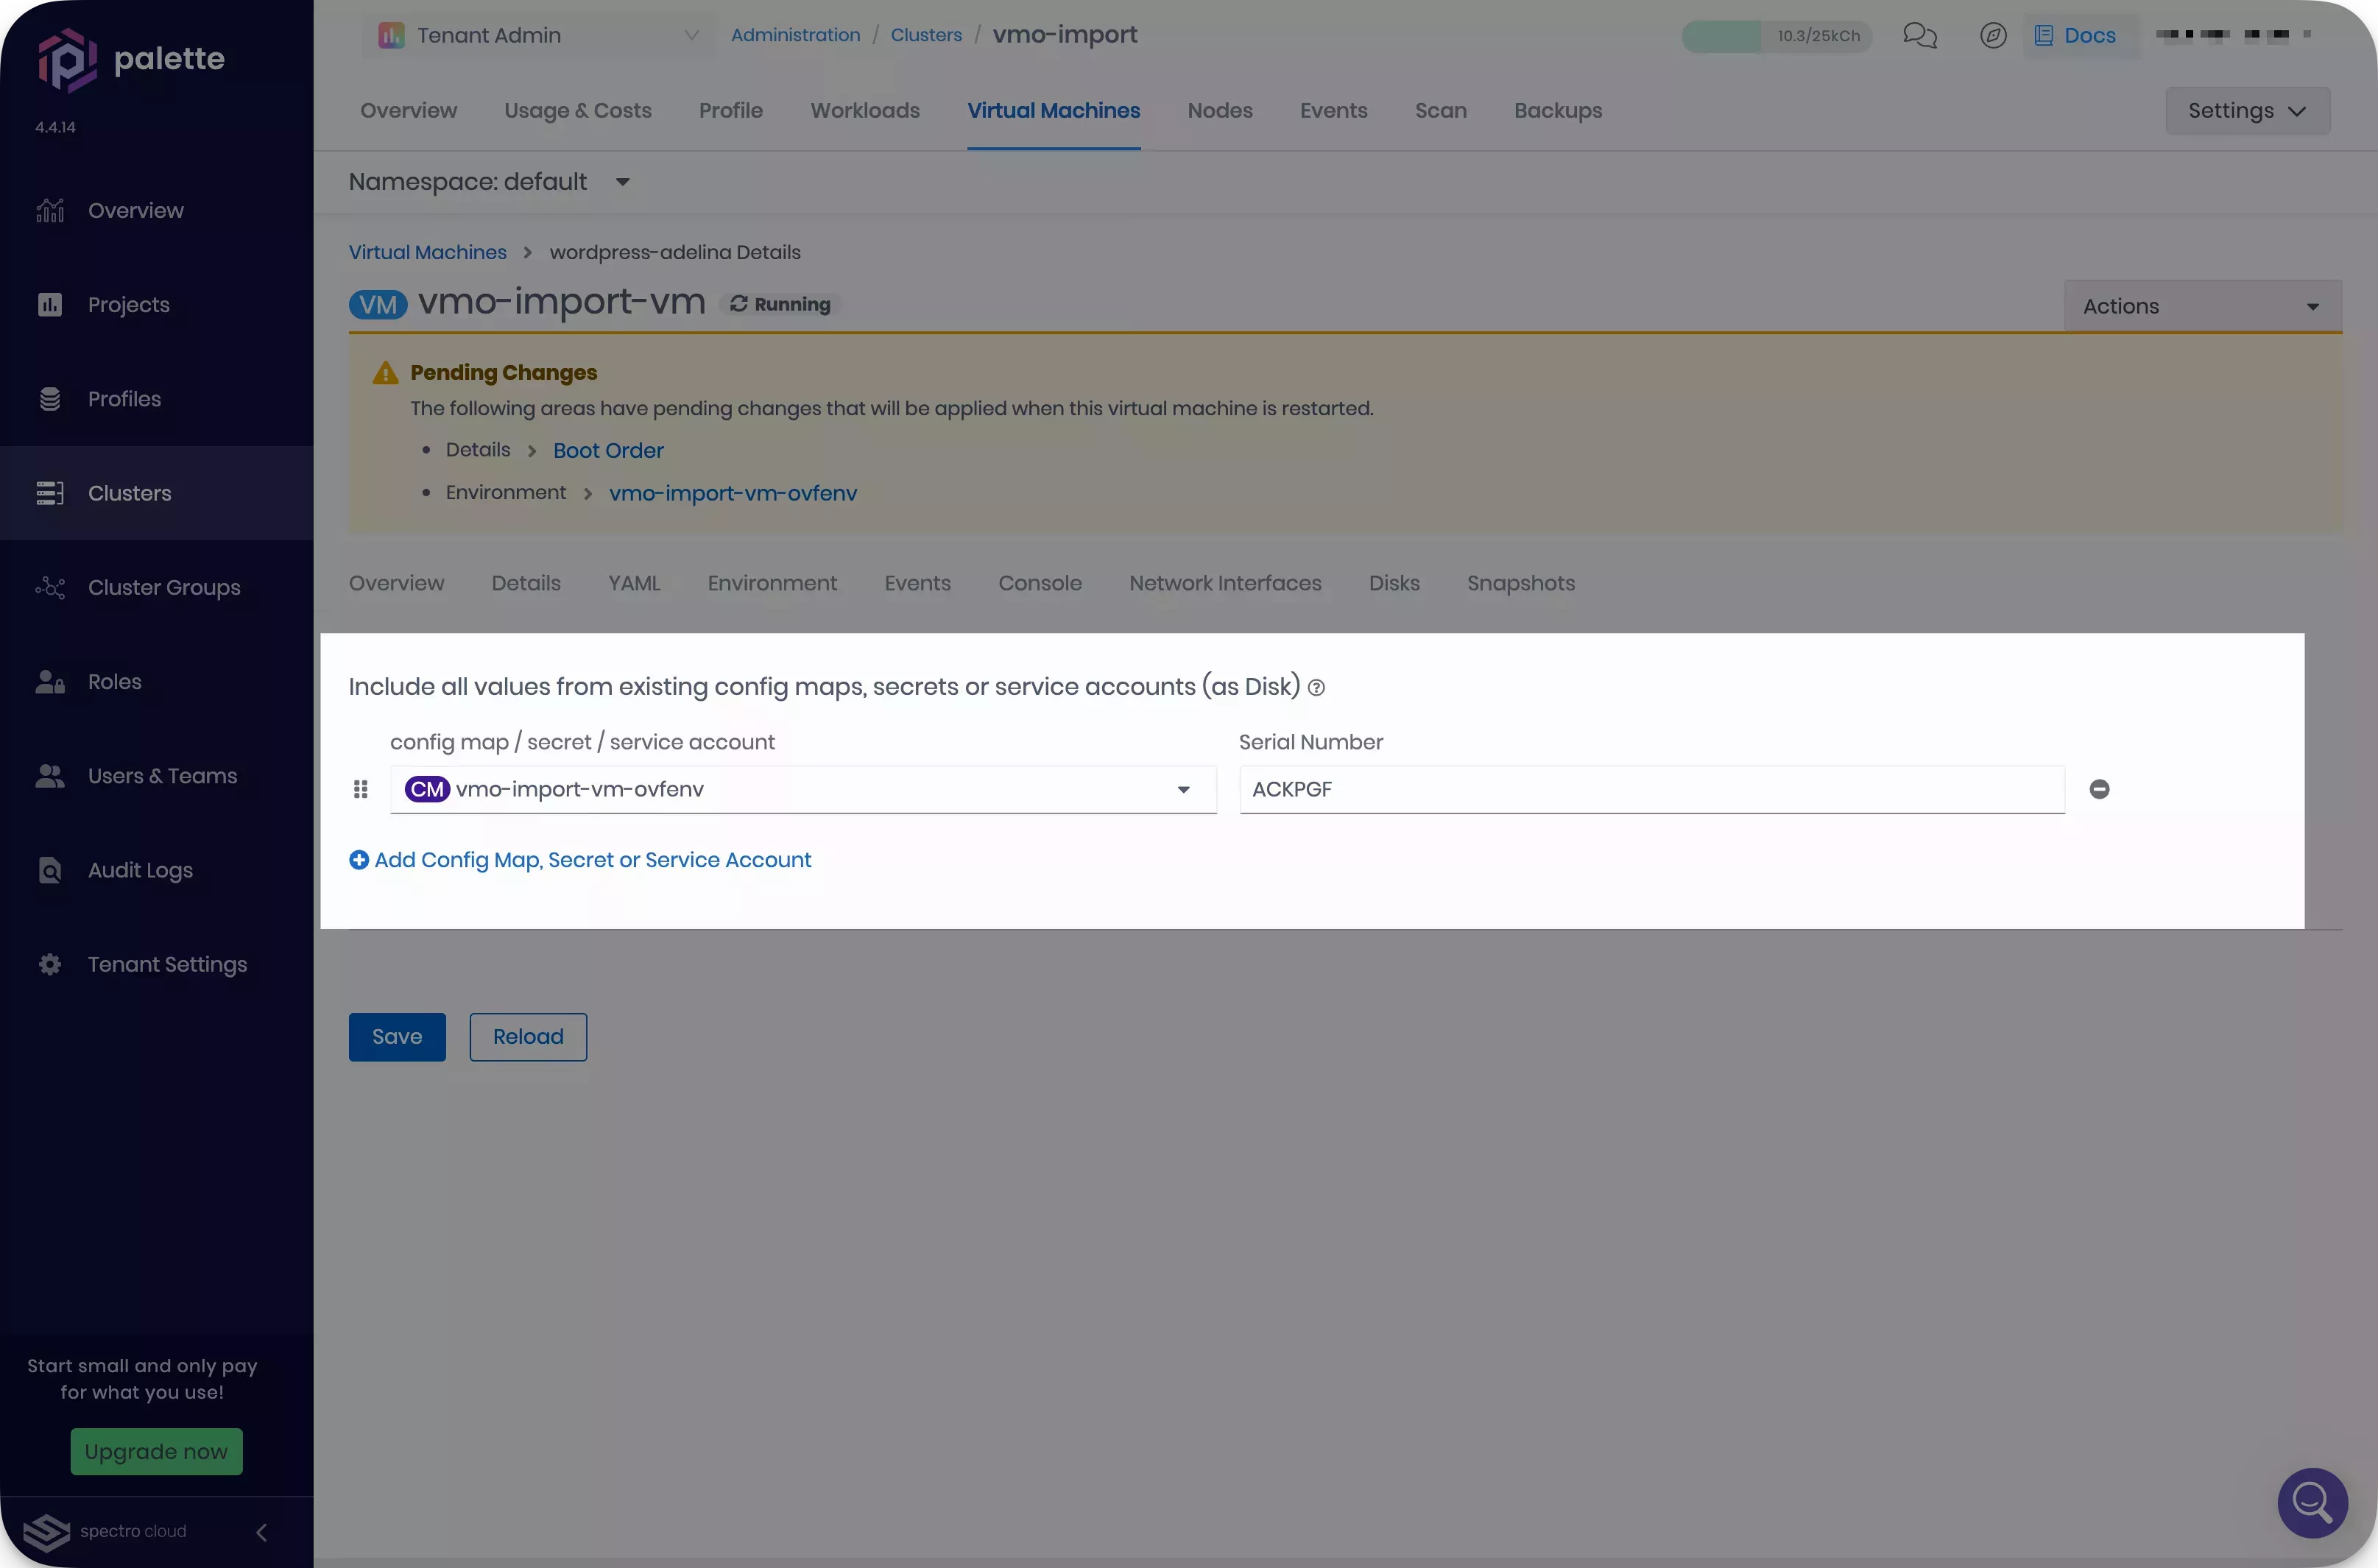
Click the second warning button, named after the clusters Environment configuration. Select a new Serial Number for your environment ConfigMap. Then, click Save.
-
Select the Actions drop-down Menu. Then, select Restart to apply your changes. Once your changes have been applied, Palette will not display any warnings.